|
|
|
|
Appaserver is a MySQL user interface. It uses Apache to couple MySQL to your browser.
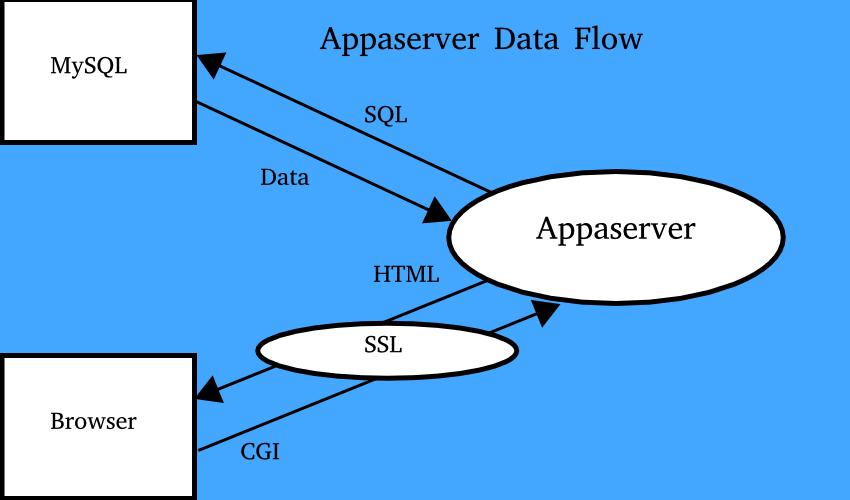
Refer to the Appaserver Data Flow diagram. The cycle begins by first choosing a table to insert into or lookup from. Appaserver generates and sends a select SQL statement to MySQL, requesting the column names of your table. MySQL returns data containing the table's column names and other metadata to Appaserver.
Appaserver then generates HTML tags and sends them to your browser. The HTML tags will be blank widgets if you are inserting and query widgets if you are selecting.
Your browser displays a dialog-box (form) that contains a Common Gateway Interface (CGI) "Submit" button. After you submit your form, the browser sends its contents to Appaserver. Appaserver generates and sends the next appropriate SQL statement to MySQL. The cycle then repeats.
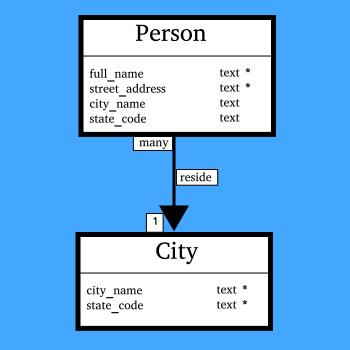
See figure 1. We will build a user interface for two tables -- "person" and "city" -- without programming. After the database is created, Appaserver will generate every form in real-time. All the forms together will enable your users to select, insert, update, and delete any row from both tables. The user interface will also enforce the following integrity constraints:
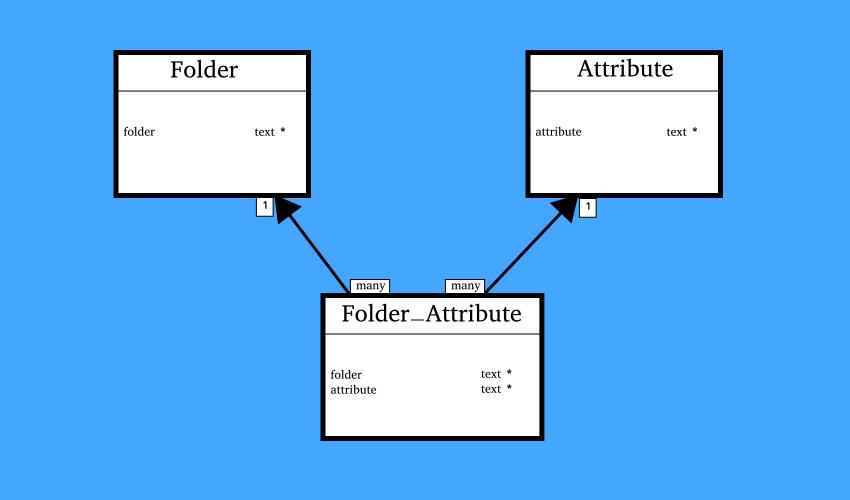
Appaserver stores tables in a table called "folder." (Unfortunately, "table" is a reserved word.) Likewise, Appaserver stores columns in a table called "attribute." (Unfortunately, "column" is a reserved word.) To show that an attribute helps describe a folder, insert a row into a folder called "folder_attribute." Figure 2 shows how to represent these properties in a database schema.
To create Appaserver applications, you first need Appaserver. Because Appaserver securely communicates with both Apache and MySQL, installation has multiple steps. The installation steps are available at github.com/timhriley/appaserver/blob/master/INSTALL. You will install a database called "template" from which all your applications are spawned. Alternatively, you can securely create an Appaserver application at cloudacus.com.
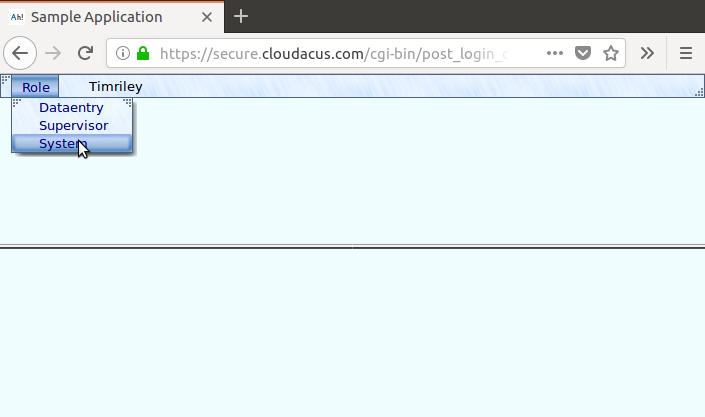
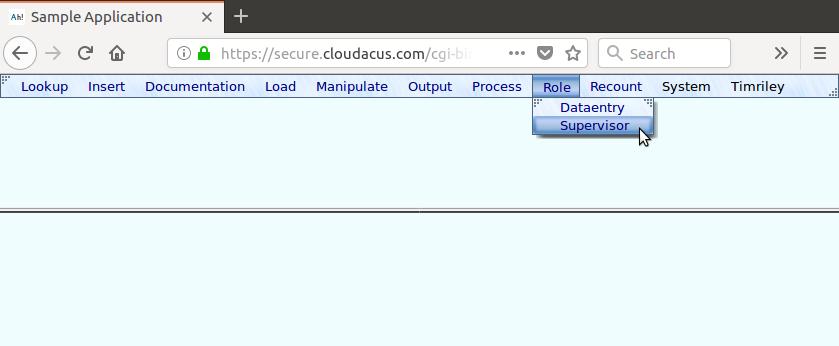
After you create your first application from the template database, you are ready to build it. After you log in, you are presented with three preinstalled roles. See figure 3.
Appaserver's security centers around roles. You grant permissions to roles, and you assign users to roles. The "System" role is used to build your database. Users interact with the database in all the other roles.
The highest user role is "Supervisor." The "Supervisor" role has permission to select, insert, update, and delete every row in every application table. Two important considerations are:
Subordinate user roles may be created.
The lowest subordinate role is "Public." The "Public" role has select permission only. It is used in publicly funded research applications. Cloudacus hosts a research application called "Benthic." See cloudacus.com/benthic. "Public" also may be used in commercial applications to display inventories.
The next lowest subordinate role is "Dataentry." We will give the "Dataentry" role insert permission but not update nor delete. If someone in the "Dataentry" role comes across a mistake, then a supervisor needs to be interrupted to make the fix.
You may create many subordinate roles above these two.
Choose the "System" role.
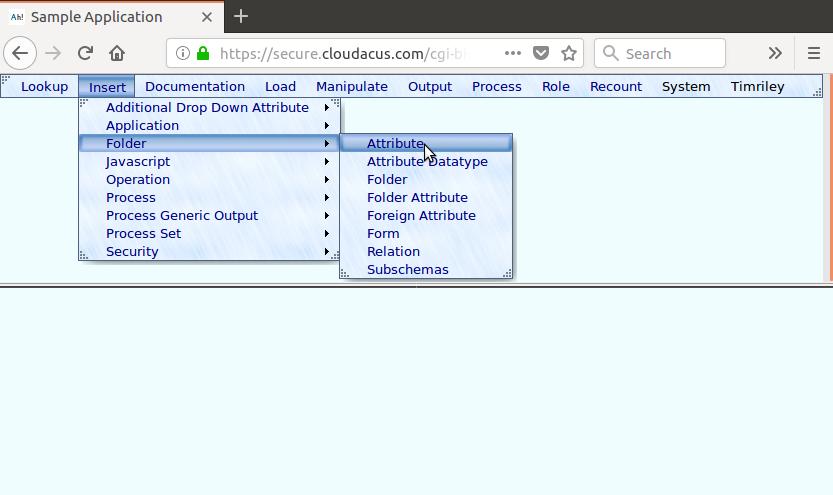
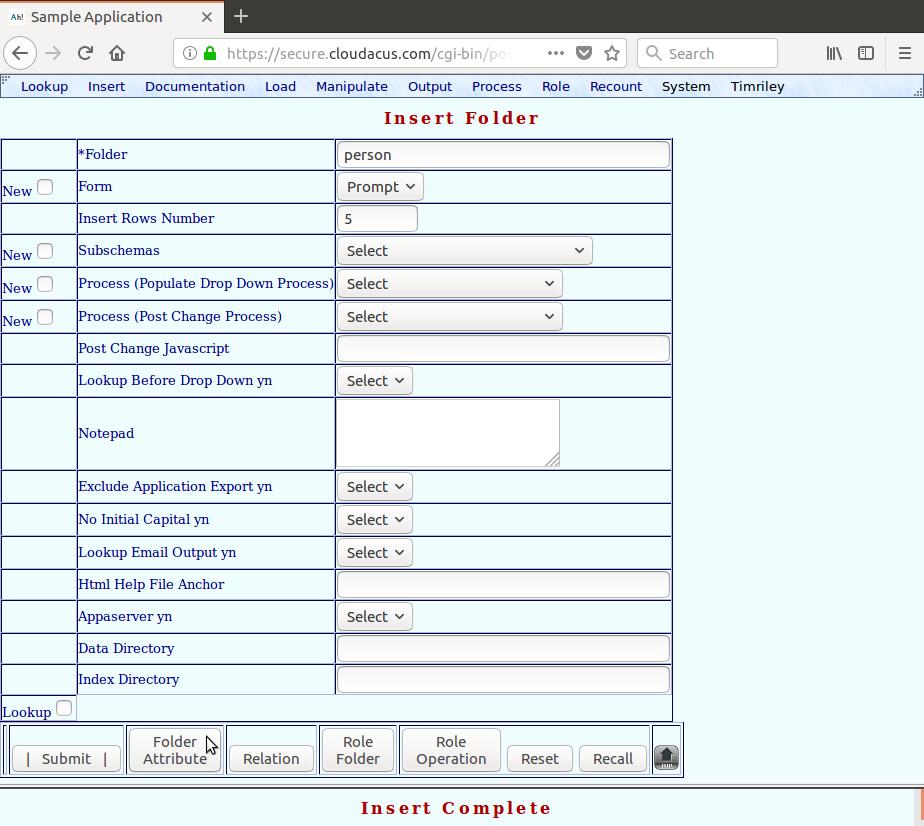
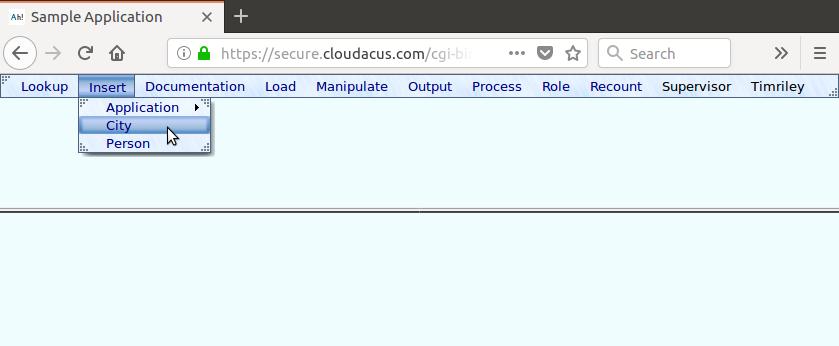
First insert the attributes into your database. The menu path is "Insert", "Folder", "Attribute." See figure 4.
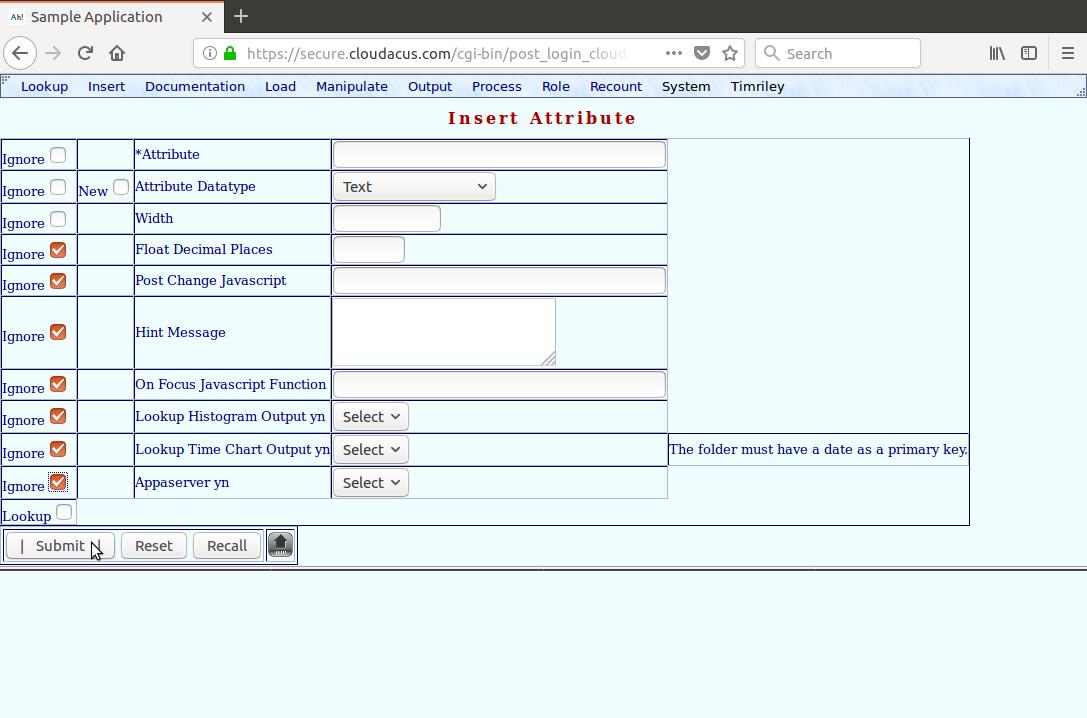
See figure 5. The resulting form's title is "Insert Attribute." You will insert into the "attribute" folder the new attributes -- "full_name", "street_address", "city_name", and "state_code." (Refer back to figures 1 and 2.)
Because we are not concerned with features, press the "Ignore" checkbox next to every row except "attribute.attribute", "attribute.attribute_datatype", and "attribute.width."
All of our new attributes are text datatypes; therefore, select "Text" to the right of "attribute.attribute_datatype."
Notice the asterisk (*) to the left of "attribute.attribute." It is a primary key and, therefore, required. Whereas you may enter in one attribute at a time, by leaving the primary key blank, you can generate multiple data entry rows to efficiently insert multiple attributes.
Press the "Submit" button.
The result displays in the bottom frame. The resulting form's title is also "Insert Attribute." You are presented with blank widgets. Type in the four "person" attributes and the maximum widths. See figure 6.
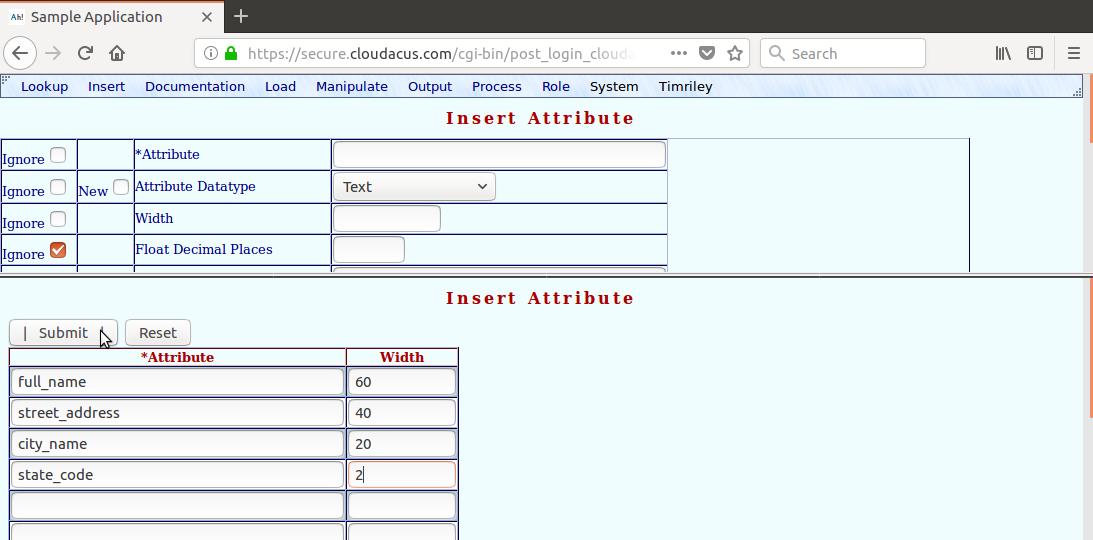
After pressing the "Submit" button in the bottom frame, four "insert into attribute" SQL statements are generated and sent to MySQL. If you inadvertently enter in a duplicated "attribute.attribute", it will be rejected and MySQL's "duplicate" error message will be displayed.
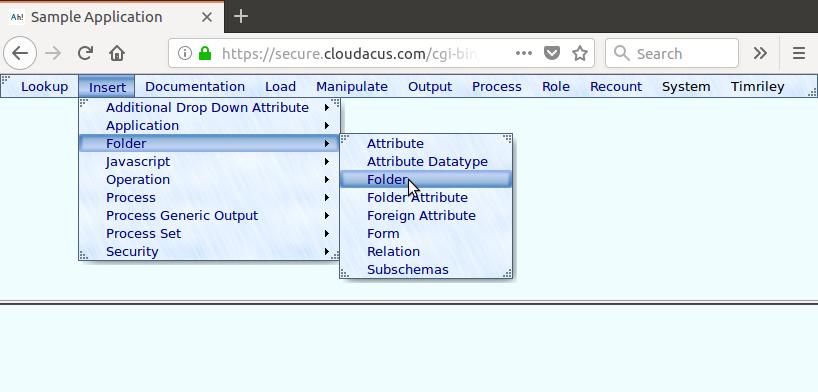
After you insert the attributes, then insert the folders. The menu path is "Insert", "Folder", "Folder." See figure 7.
The resulting form's title is "Insert Folder." When inserting folders, it is best to start with the "one" folders in the diagram and work inward towards the "many" folders. (Refer back to figure 1.) Therefore, we will first insert "city" and then "person."
See figure 8. You are presented with blank widgets containing all the attributes of the "folder" folder. We are going to insert the "city" row into the "folder" folder. Since we are not concerned with features, just enter in the first three rows. The "folder.folder" is "city", "folder.form" is "Table", and "folder.insert_rows_number" is 5. Users may insert five cities at a time.
The "Table" form affects the behavior when a user chooses the "Lookup", "City" menu path. Because the "City" table is going to have relatively few rows, Appaserver will display the entire table without a query form.
When you are finished, press the "Folder Attribute" button.
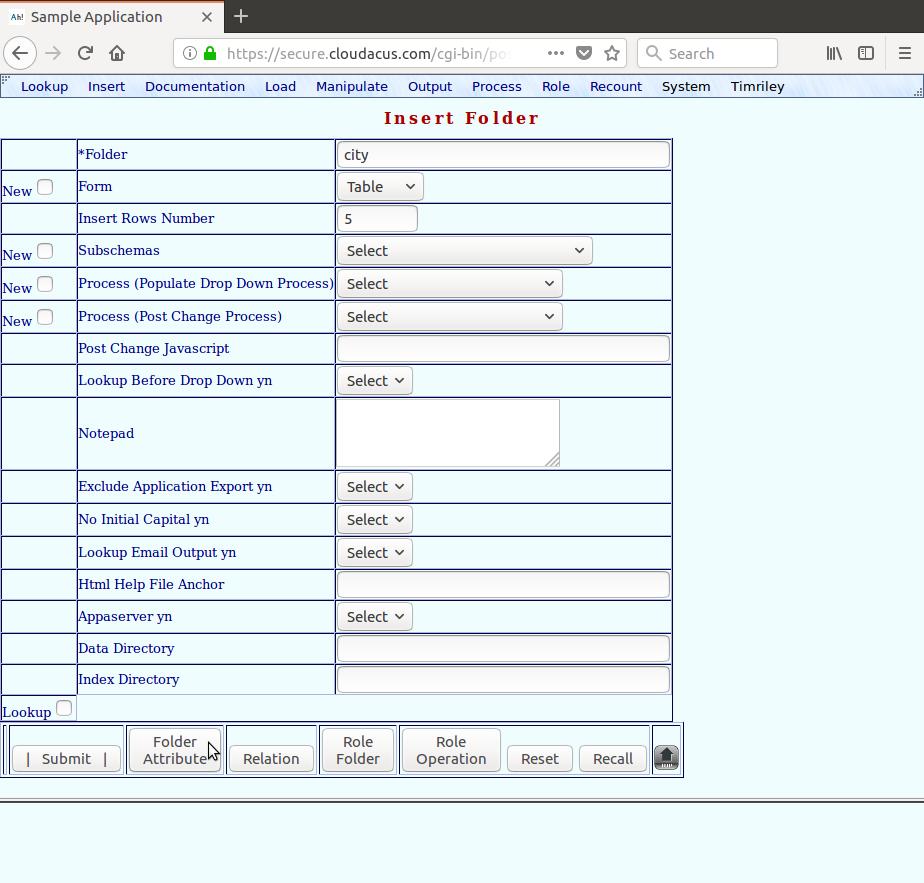
The "Folder Attribute" button causes two activities to take place: 1) An "insert into folder" SQL statement is generated and sent to MySQL. 2) The "folder_attribute" folder is displayed in the bottom frame with blank widgets for data entry. (Refer back to figure 2.)
The resulting form's title is "Insert Folder Attribute." Assign the two attributes describing a city -- "city.city_name" and "city.state_code." Two cities may share the same name; however, they must be in separate states. Therefore, assign "city.city_name" as primary key index 1 and assign "city.state_code" as primary key index 2. See figure 9.
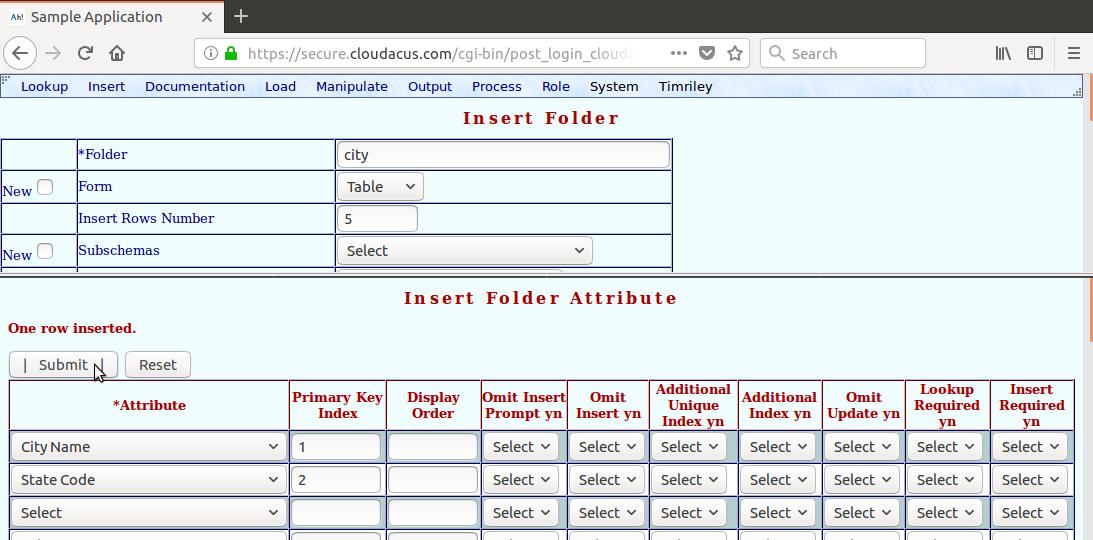
After pressing the "Submit" button, two "insert into folder_attribute" SQL statements are generated and sent to MySQL. This starts a series of data entry blocks. (Refer back to the row of buttons in figure 8.) The next block is to insert many-to-one relations. Press "Submit" without entering any. The next block is to insert role permissions for "city." We will give the "Supervisor" role insert and update permissions. See figure 10.
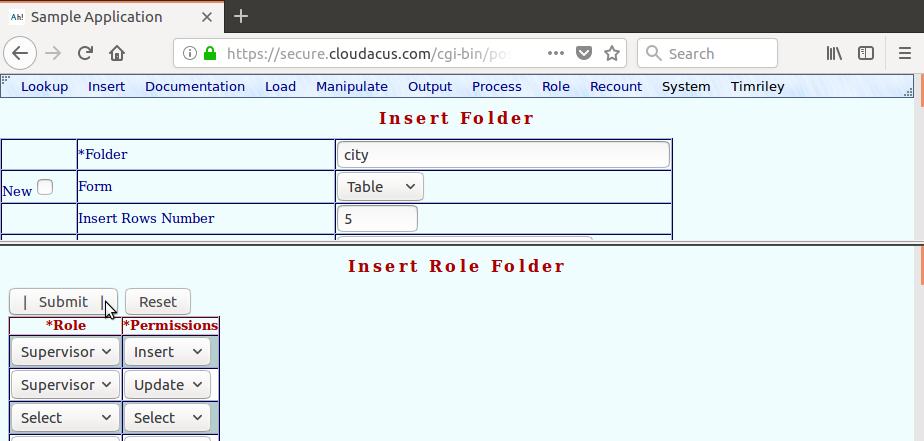
After pressing the "Submit" button, two "insert into role_folder" SQL statements are generated and sent to MySQL. The next block is to assign Appaserver operations to roles. Appaserver operations are external programs that execute on a single row.
One valuable operation is "Detail." It allows you to drill-down on a row to display all of its many-to-one and one-to-many metadata. Then each metadata row has a "Detail" button, allowing you to traverse your entire database.
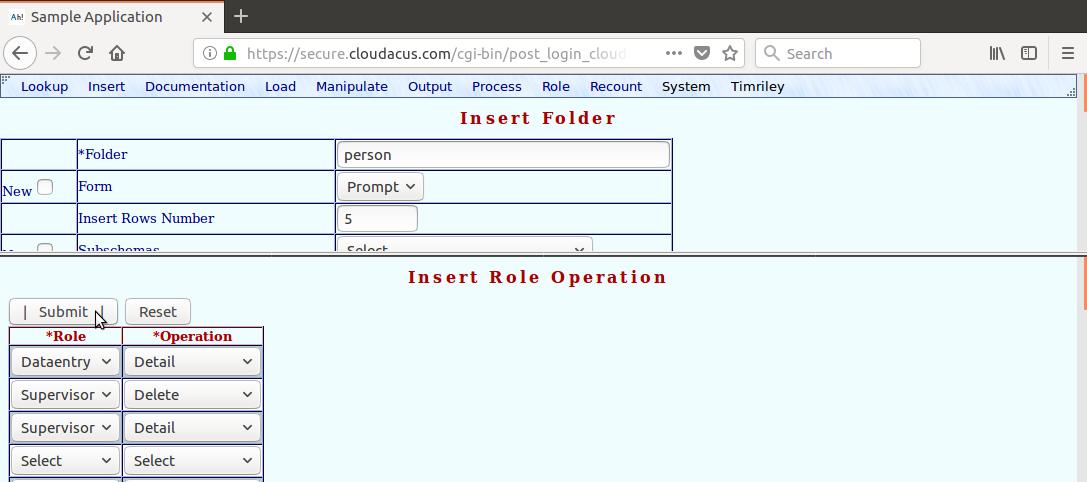
The "Supervisor" role also needs to be able to "Delete" a city. See figure 11.
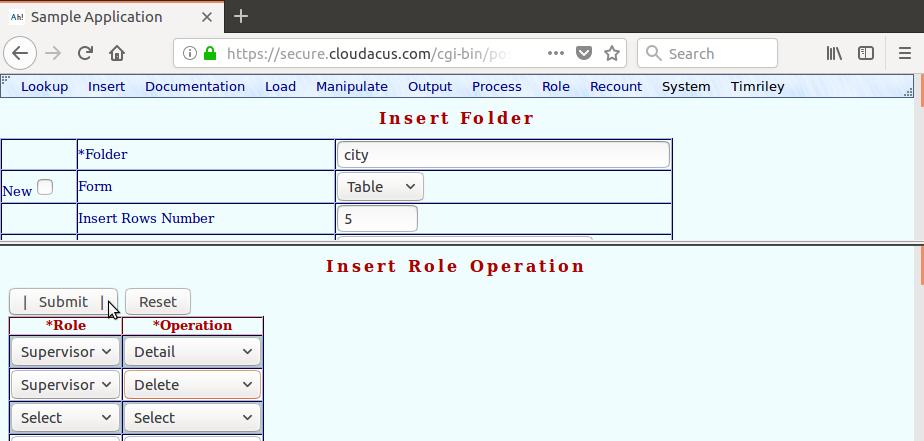
After pressing the "Submit" button, two "insert into role_operation" SQL statements are generated and sent to MySQL. This completes the series of data entry blocks. The resulting form's title is "Insert Complete."
We are going to insert the "person" row into the "folder" folder. Press the "Reset" button -- the one in the top frame. (Refer back to the row of buttons in figure 8.)
See figure 12. Enter in the first three rows -- "folder.folder" is "person", "folder.form" is "Prompt", and "folder.insert_rows_number" is 5. Users may insert five persons at a time.
The "Prompt" form affects the behavior when a user chooses the "Lookup", "Person" menu path. Because the "person" table is going to have many rows, Appaserver will display a prompt form (query widgets) before the table form is displayed. Appaserver will generate a "where clause" before selecting from "person."
When you are finished, press the "Folder Attribute" button.
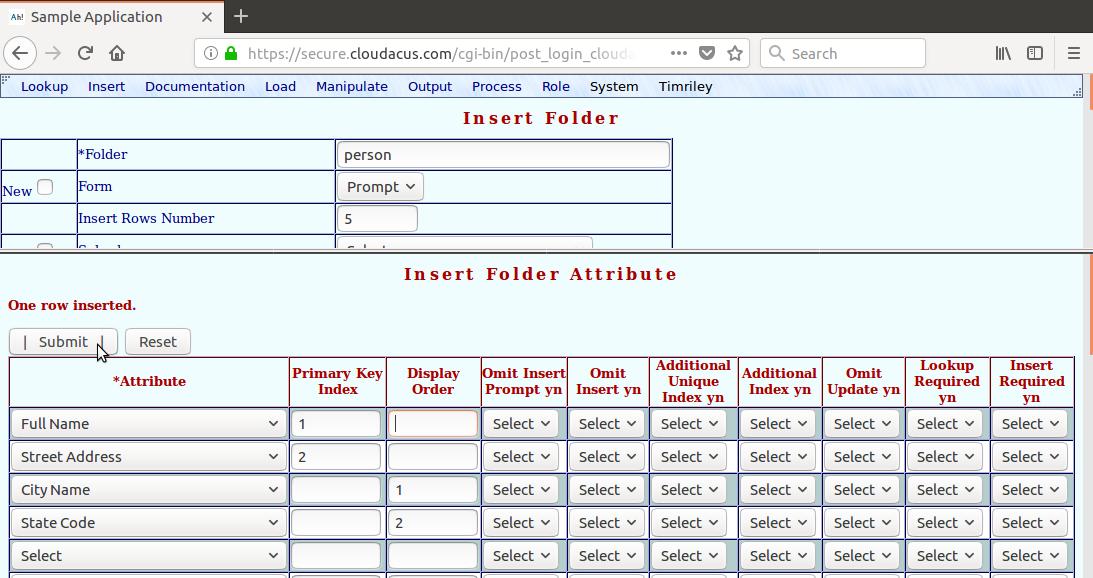
The "Folder Attribute" button causes two activities to take place: 1) An "insert into folder" SQL statement is generated and sent to MySQL. 2) The "folder_attribute" table is displayed with blank widgets for data entry. (Refer back to figure 2.) The resulting form's title is "Insert Folder Attribute." Enter in the four attributes describing "person." Two persons may share the same name; however, they must not also share the same street address. Therefore, assign "person.full_name" as primary key index 1 and assign "person.street_address" as primary key index 2. Assign "person.city_name" as display order 1, and assign "person.state_code" as display order 2. See figure 13.
After pressing the "Submit" button, four "insert into folder_attribute" SQL statements are generated and sent to MySQL. This starts a series of data entry blocks. (Refer back to the row of buttons in figure 12.) The next block is to insert many-to-one relations. Set "Folder (Related Folder)" to "City", and set "Attribute (Related Attribute)" to "Null." See figure 14.
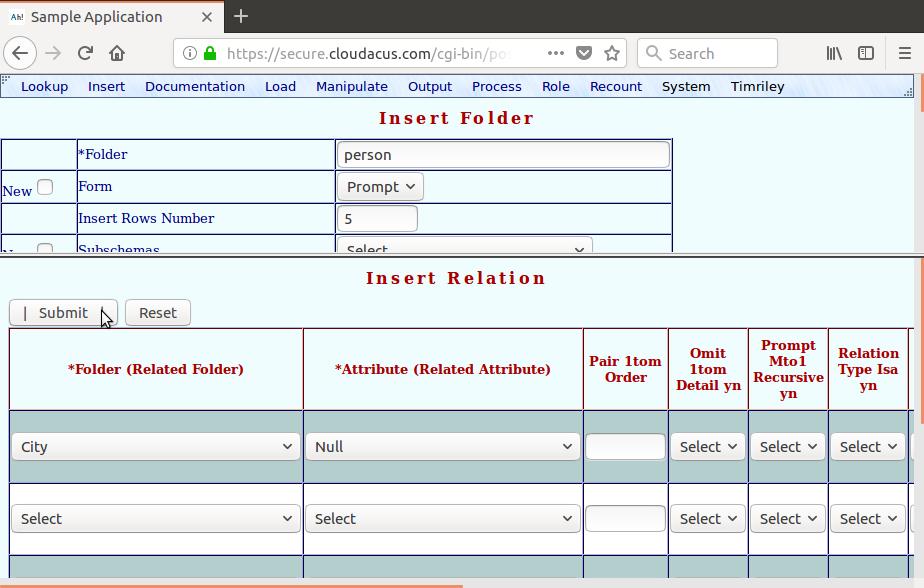
See figure 15. We have a many-to-one relationship from "Person" to "City." The "city" folder has primary key attributes of "city.city_name" and "city.state_code." Therefore, the "person" folder has foreign key attributes of "person.city_name" and "person.state_code." They are exactly the same; however, they need not be. Because they are the same, we set "Attribute (Related Attribute)" to "Null." Five notes to consider are:
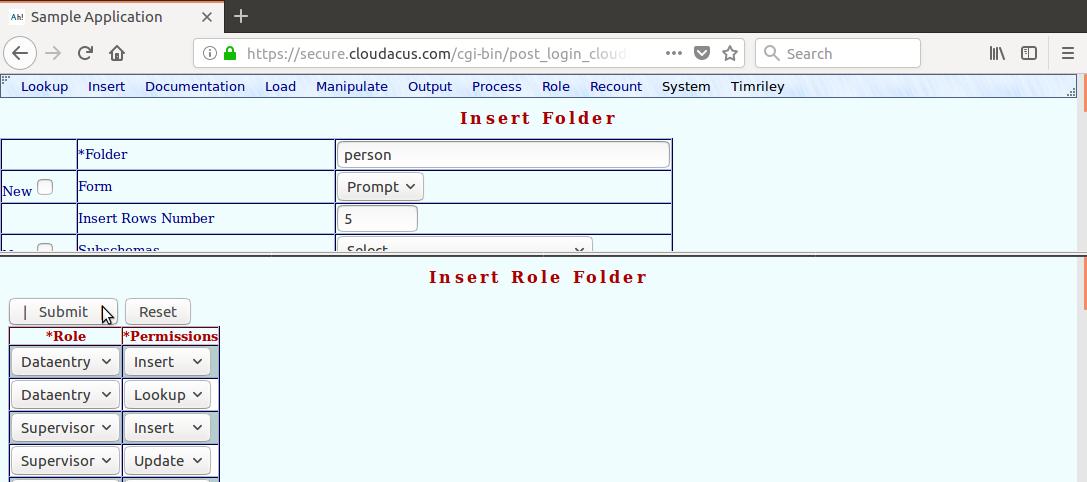
After pressing the "Submit" button, an "insert into relation" SQL statement is generated and sent to MySQL. The next block is to insert role permissions for "person." We will give the "Supervisor" role insert and update permissions. We will give the "Dataentry" role lookup and insert permissions. "Lookup" and "Insert" refer to the first two menu choices located at the top-left corner of the top frame. See figure 16.
After pressing the "Submit" button, four "insert into role_folder" SQL statements are generated and sent to MySQL. The next block is to assign Appaserver operations to roles. Assign the "Detail" operation to "Supervisor" and "Dataentry", and assign the "Delete" operation to "Supervisor." See figure 17.
After pressing the "Submit" button, three "insert into role_operation" SQL statements are generated and sent to MySQL. This completes the series of data entry blocks. The resulting form's title is "Insert Complete."
After you finish the series of data entry blocks, create the "person" and "city" tables. The menu path is "Process", "Create Table." See figures 18 and 19.

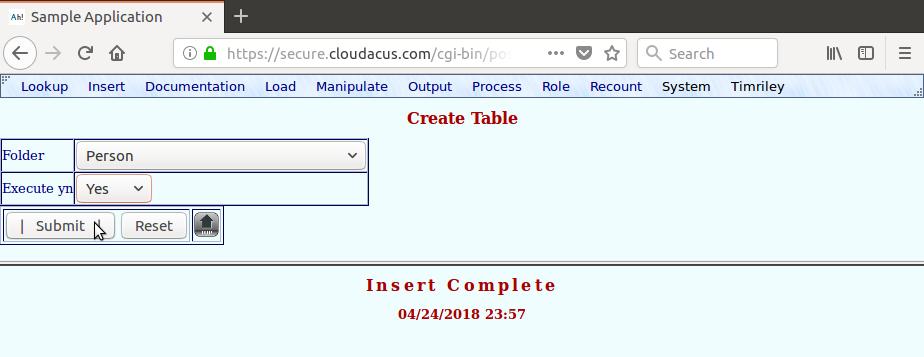
Repeat the "Create Table" process for the "City" table.
See figure 20. Switch to the "Supervisor" role. The menu path is "Role", "Supervisor." You may want to switch to the "Dataentry" role to test the restricted permissions.
To insert new cities, the menu path is "Insert", "City." See figure 21.
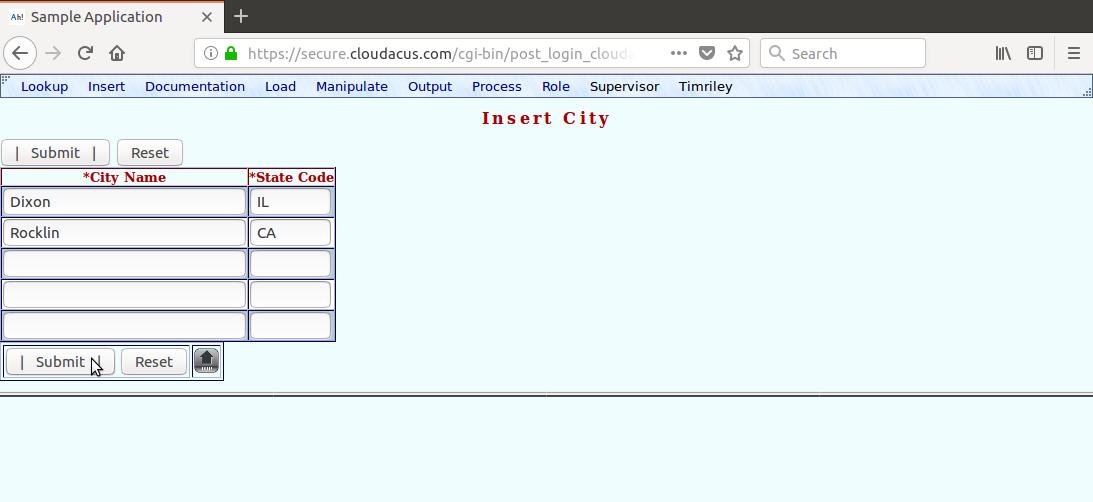
The resulting form's title is "Insert City." Earlier, we set "folder.form" to "Table" and "folder.insert_rows_number" to 5 where "folder.folder" is "city." (Refer back to figure 8.) You are, therefore, presented with five rows of blank widgets containing the two attributes of the "city" folder. Figure 22 shows these blank rows populated with two cities.
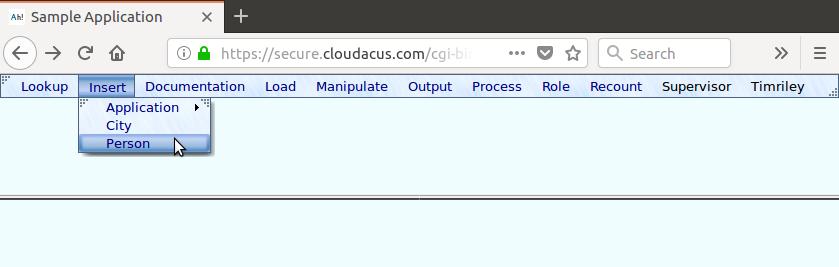
To insert new persons, the menu path is "Insert", "Person." See figure 23.
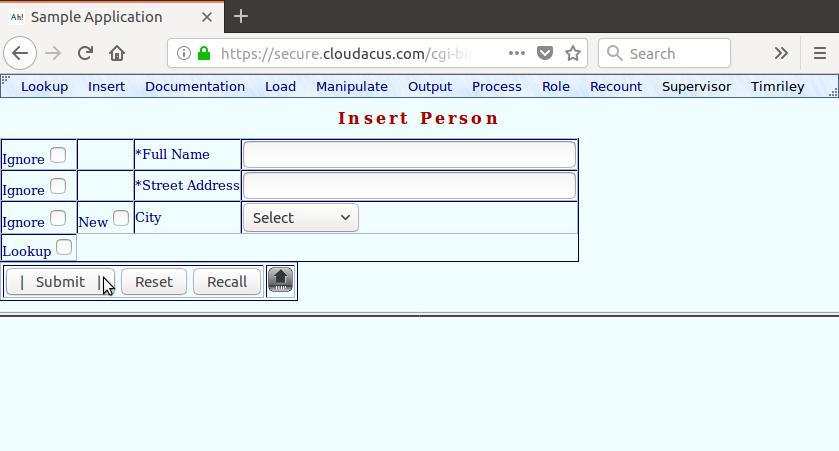
See figure 24. The resulting form's title is "Insert Person." Earlier, we set "folder.form" to "Prompt" where "folder.folder" is "person." (Refer back to figure 12.) You are, therefore, presented with a prompt form containing blank widgets representing the "person" folder.
Notice the asterisks (*) to the left of "person.full_name" and "person.street_address." They are primary keys and, therefore, required. Whereas you may enter in one person at a time, by leaving a primary key blank, you can generate multiple data entry rows to efficiently insert multiple persons.
Press the "Submit" button.
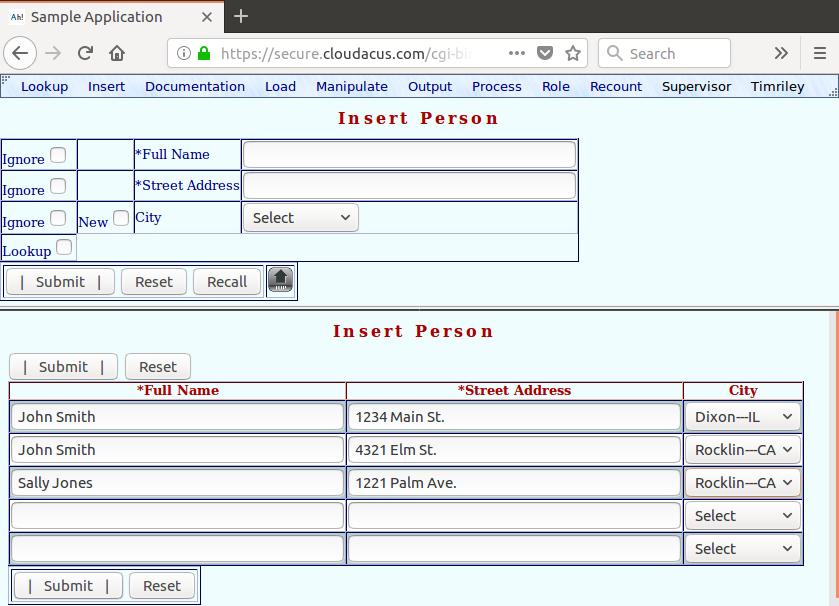
Earlier, we set "folder.insert_rows_number" to 5. (Refer back to figure 12.) By pressing "Submit" without all the primary key attributes populated, Appaserver presented five blank rows in the bottom frame. Figure 25 shows these blank rows populated with 3 persons.
Assume multiple persons have the same name. Also, assume a female is engaged and will likely change her name. Moreover, a person is looking to move. These three scenarios may cause a database developer consternation. However, the primary keys for the "person" folder are both "person.full_name" and "person.street_address." Therefore, "person.full_name" can be duplicated. Moreover, Appaserver propagates changes in a primary key across the foreign keys of related tables. Therefore, names can change and anyone can move.
To lookup an existing person, the menu path is "Lookup", "Person." See figure 26.
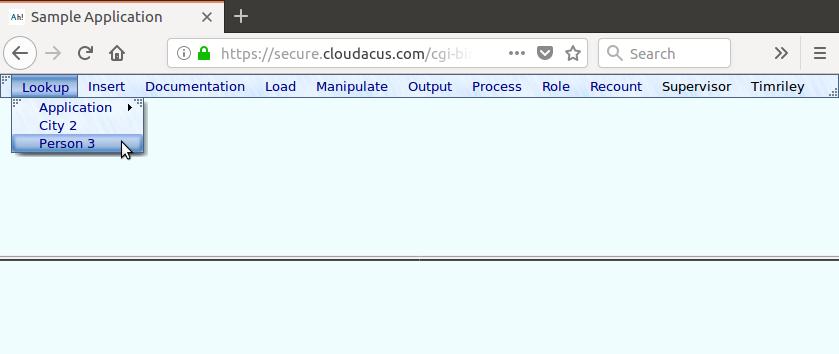
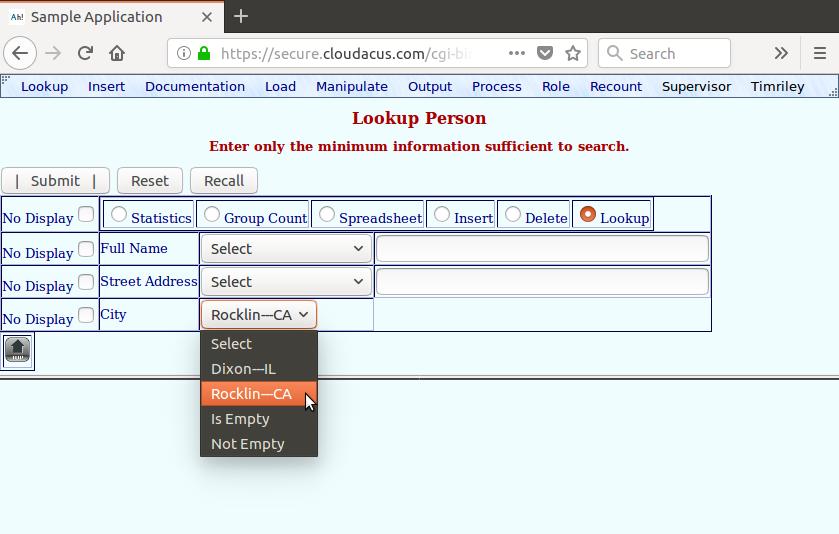
See figure 27. The resulting form's title is "Lookup Person." Earlier, we set "folder.form" to "Prompt" where "folder.folder" is "person." (Refer back to figure 12.) You are, therefore, presented with a prompt form (query widgets) representing all the attributes of the "person" folder. You can select all or some persons, like those living in Rocklin.
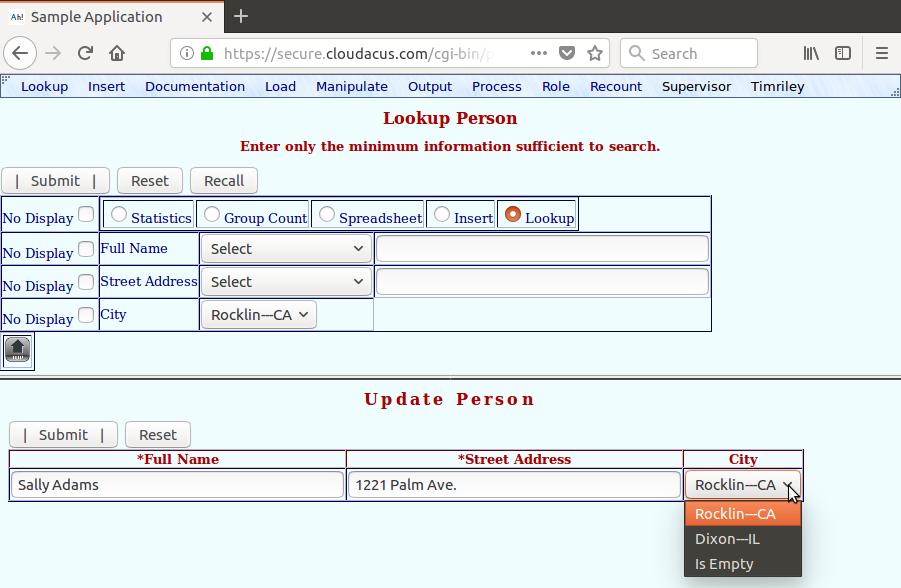
After pressing "Submit", Appaserver displays the selected rows in populated widgets. The "Dataentry" role will receive view-only widgets; the "Supervisor" role will receive changeable widgets. Assume you want to change a person's name and delete a person. See figure 28.
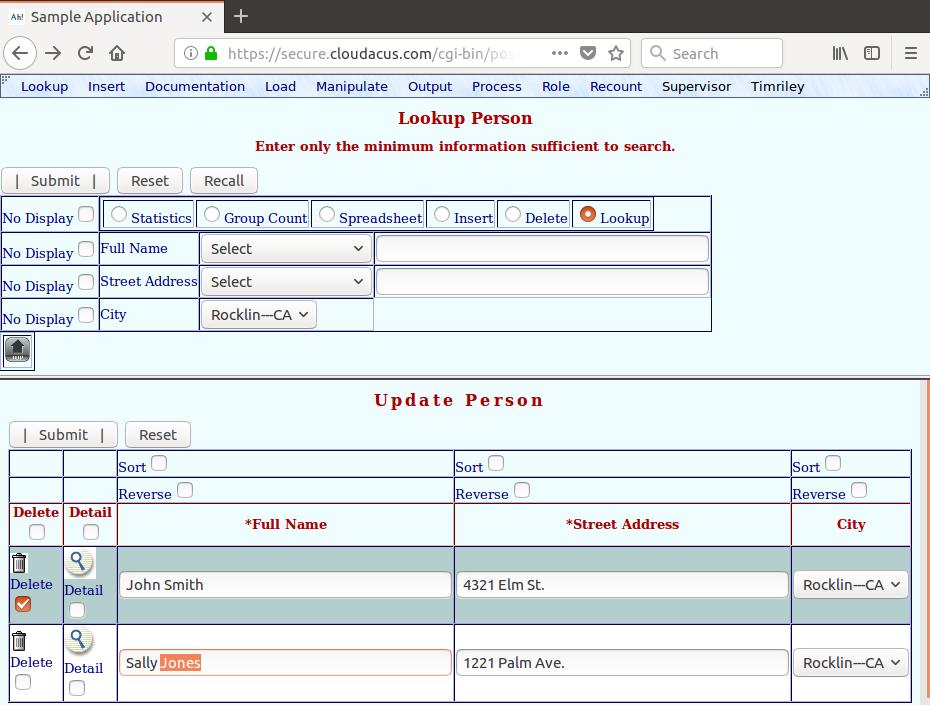
Figure 29 shows the finished result.
Each form was generated without programming; however, additional code can add features. Dialog-box features may be programmed in JavaScript, and process features may be programmed in any language.
Detailed documentation is available at appahost.com/appaserver, including appahost.com/appaserver_database_schema.pdf. Your blank Appaserver application came with a process to import PredictBooks Home Edition -- an accounting application. Trace through it.
Appaserver implements the relational model with a user interface. The user interface is consistent within your application -- both at the system level and the user level. Once you discover its look and feel, those skills will transfer to any other Appaserver application.
Home | About Us | PredictBooks | Appaserver | Cloudacus | Contact |  |
|||||
|
|||||